|
Background:
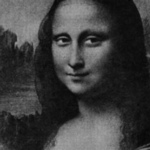
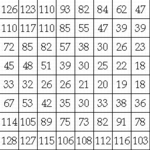
1. A digital image is numbers (in base 2 or binary format) arranged on
a grid.
2. The numbers in the grid of a digital images are saved in a variety of formats.
- Bitmap or .bmp files--the "native language" for graphics on Windows machines.
- PICT or .pict files--the "native language" for graphics on Macintosh machines.
o Advantage: these formats preserve all the numbers (or data) in the grid, thus they are called "lossless" format.
o Disadvantage: these formats can only be read on the appropriate computer platform, Mac or Windows
- TIFF or tagged image files--another lossless format that is platform independent.
o Advantages: lossless graphic format that can be read on Mac or
Windows machines
o Disadvantage: large file sizes
- JPEG or Joint Photographic Experts Group image
files--this compressed file format can be read on either platform and
is the standard for the Internet. It results in much smaller file
sizes...but some data has been lost (i.e. not all the numbers in the
grid are saved). This is one of the image file formats used on the
Internet.
- GIF or Graphics Interlaced Format image files--this
compressed file format can be read on either platform and is best for
graphics--images with only a few different colors. It also results in
smaller file sizes though it does not lose any data. It does not work
well for saving photos.
3. Modern digital cameras and scanners tend to create huge images,
images that are too large and can significantly slow down or crash
software programs like MS Office. The solution is to prepare any image
in an image editing program before you use it.
- Images can be too big in three ways:
- The actual size of the grid paper can be too large--e.g. a 100 cm by 100 cm image
- The number of colors used in the image can be too
great--typical cameras and scanners save images with 16 million
different colors. Each of these numbers requires more "places" to store
in base 2, and each place requires additional memory.
- The number of dots per inch for the image can be too
great--e.g. an image might be scanned at 600 dots per inch when the
computer screen where they will be viewed on monitors that only display
72 dots per inch.
- Solution--open any image in image editing software and resize it for your purpose.
There are many different kinds of image editing software
- PhotoShop--a great program, but expensive and not available in many schools
- PhotoShop elements--a scaled down and more affordable version of PhotoShop
- Microsoft Photo Editor--a tool available on all Windows computers that comes with the operating system.
- iPhoto--an increasingly useful photo editor on the Macintosh platform. Newer versions of
Task:
At the end of the time you will each have a folder of
digital images that you captured from various devices and resized using
different software. We will use these images in some other activities.
As a group, capture an image from each of the following
devices.
- Scanner: Scan
in something from a book
- USB
microscope: capture an image using the microscope. Human hair, or the
pixels on a computer screen, or the texture of one of Maggie's cinnamon
rolls--be creative!
- Digital
still camera (How about a small group photo? Or something of interest on
campus)
- Paint: use
a Paint program and draw a diagram of something that you might teach to
your students. For an example see the Paint item on the EDUC 537
webpage.
http://fg.ed.pacificu.edu/charlesm/courses/educ537/Assignments/paint/index.html
- Web: go
to http://webquest.sdsu.edu/graphics.html to link to sites that provide copyright-free graphics
that you can use in your classroom. Find one and download it on to the
desktop of your computer
- Windows
users: right mouse click on any graphic to save it
- Mac
users: Click and hold or CTRL-click on any graphic to save it
- Screen capture: Practice
taking a "picture" or "capturing" a part of your screen. This is
especially useful when creating directions for your students
- Mac: Shift/Apple/4
changes your cursor to a "crosshair." Drag the part of the screen you
want to capture. Image is saved a "Picture x" on your desktop.
- look up "screen capture" in the OS help menu for more details
- Windows:Alt/Printscreen
captures the active window to the clipboard. Paste that image into any
image editing software and resize it as needed.
- Or download a free image capture utility like MWSnap to capture parts of the screen.
Then resize that image using
image editing software. I suggest a size of somewhere between 150 and 300 pixels across. Image editing software includes:
- Microsoft
Office Picture Manager (Windows: comes with Office XP as part of the
Microsoft Office Tools)
- Microsoft
Photo Editor (Windows: comes free with most older Windows computers)
- iPhoto
(Macs: comes free with OS X
- Photoshop
(selected Windows and Macs in the lab)
- Photoshop
Album (selected Windows computers)
- Photoshop
Elements (on the scanners)
- Graphic
Converter (Macs)
- AppleWorks
(Macs)
Put the resized image together with the original inside a
folder. Put the folder of images inside each of your student folders so that
you can use them for future tasks.
|