Expressive Arts Lesson Plan


Lesson Title: Alien Name Art (idea from http://www.kinderart.com/drawing/name.shtml)
Teacher: Nicole Lipton
Date: December 11, 2015
Unit Title: Monsters & Alien Names
Unit Goal(s): Understanding of using different types of writing to make a picture, abstract thinking
Grade/Content Area: First Grade/ Art, Language Arts, and Writing, abstract thinking
Context: This lesson doesn’t fit into a larger overarching unit. This lesson was a supplemental activity. However, the student will read books and write stories about aliens and monsters, etc. The students will also be doing math monsters, addition and subtraction lesson before this activity.
TIP Critical Question: In what ways does cooperative learning, facilitate a deeper understanding among children?
Standards:
•1.RL.1 Ask and answer questions about key details in a text.
•1.RI.4 Ask and answer questions to help determine or clarify the meaning of words and phrases in a text.
•1.RI.6 Distinguish between information provided by pictures or other illustrations and information provided by the words in a text.
•MA.1.CR1.1 Express and share ideas for media artworks through sketching and modeling.
•VA.1.CR1.1 With support, develop an idea for an artwork based on a theme (e.g. personal or family story).
•VA.1.CR1.2 Use observation and investigation to make a work of art.
•VA.2.CR2.1 Explore uses of materials and tools to create works of art or design.
•VA.10.CO1.1 Use and share personal experiences and interests in creating artwork.
Learning Targets: I will be able to demonstrate my understanding of what an alien is. I will also be able to demonstrate my understanding of how to trace my name in cursive. I will start to think abstractly. I will be able to color in the lines. I will be able to use a sharpie without drawing on the table.
Content Objectives:
1.The first objective is to help students learn what an alien is or creepy creature. Students will be able to describe what that entails. Students will also compare the difference between a bug and alien and creature.
2.Students will develop an understanding of the beginnings of cursive writing.
3.Students will develop an understanding of how to begin to think abstractly with the idea of aliens and make believe.
Language Objectives: Students will learn new terms, such as alien, creature, and monster and be able to explain what they are to someone. The students will use reading, speaking and listening to accomplish this.
English Language Proficiency levels addressed:
Additional Language Demands.
Academic Vocabulary: alien, monster, creature, cursive, creepy, scary,
Syntax.
Discourse.
Student Assessments:
•The teacher will assess students by observing them during the lesson. Assessments will also be done based on their final product. Assessments will not be based on their level of creativity. Students must color the alien name in some form and cannot just use pencil. I encourage the students to color the picture until they feel it is finished.
Learning Materials/Preparation:
•12"x18" sheet of white Drawing Paper
•Black Sharpies (enough for every student in the class)
•Crayons and/or markers
•Students can read a number of books on aliens and monsters to coincide with this lesson. Several examples might be My Teacher Is an Alien, Ben's Alien Guide, Aliens for Breakfast, and Aliens Love Underpants. Students might use images from these books to integrate into their art.
Differentiation Strategies: If students are having a hard time, then they don't have to color the entire piece of paper. If the student needs to use thicker crayons/markers to have better grip that is okay. If students need help writing their name in cursive, the teacher can help them write it in pencil and then they can trace it with the sharpie.
Lesson Sequence
Lesson Introduction/Set: 5-8 minutes
1.I will first read 1-2 stories about monsters/aliens/creepy creatures
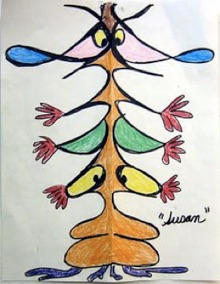
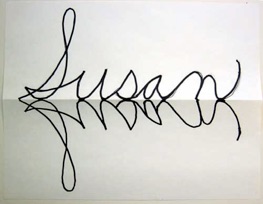
2.Then, I will introduce this activity and show each child's name to the class, as it appeared when I first wrote it on the fold. I tell them that they may create their alien/creature/bug, etc. vertically beginning at either end of the paper
3.I then open the paper and show the class the vertical mirror image of the name.
4.I tell the students that their alien can have as many ears, eyes, arms, etc. as they want. They can make it a creepy creature, or an alien, or a scene. It is up to them to be as creative as they want.
Communication of Learning Targets, Key Vocabulary and Objectives: 5 minutes
•Explain what the activity is that they will be doing
oStudents will be writing their name in either cursive or regular print and connect the lines of their name to make it look like an alien or some creature. They will trace their name on the opposite side of the paper to create a mirror image of their name.
•Give expectations of what is expected from them for the lesson
•Give rules on what is stating on task and what isn’t
oDo not write/draw/color on someone else’s paper
oKeep the cap on the sharpie
oContinue working until the teacher says so
•Explain the new vocabulary words that they will be learning
oAlien, monster, creature, cursive, creepy, scary
•Explain what they will be learning by the end of the lesson
oSWBATDTU of what an alien name looks like and how to make one
Learning Activities: 15-25 minutes
•Fold a sheet of 12"x18" white drawing paper in half. Either “hot dog” or “hamburger” style.
•Have the student's write their first name with a black sharpie along the crease of the paper (the bottom of the paper).
•Cursive works the best, but if the students cant do that, they can just write it normally.
•Turn the paper over and trace the name that you see coming through the paper. (This works best if you hold it up to a window.) When you open the paper there will be a mirror image of the student's name.
Closure: 5 minutes
•Ask the students what they learned about the activity and how they can connect their picture that they made with their name to something meaningful.
•Ask the students to describe what their picture name means and what was the connection they had to the picture.
•After the students have finished their picture, they can share it to the class and talk about what they made from their name.
•Afterwards they can post them around the room to look at if they want to.
Analysis and Reflection on Lesson:
•The students needed an example of how to write their name on the opposite side of the paper. Many students needed help with the tracing as well as the cursive part. Next time, I will do an example in class while the students watch and listen before we start the activity. I also think that this lesson might have been a little too challenging for them. Next time I will need to adapt the lesson to be better suited for them or do this lesson with a higher grade.